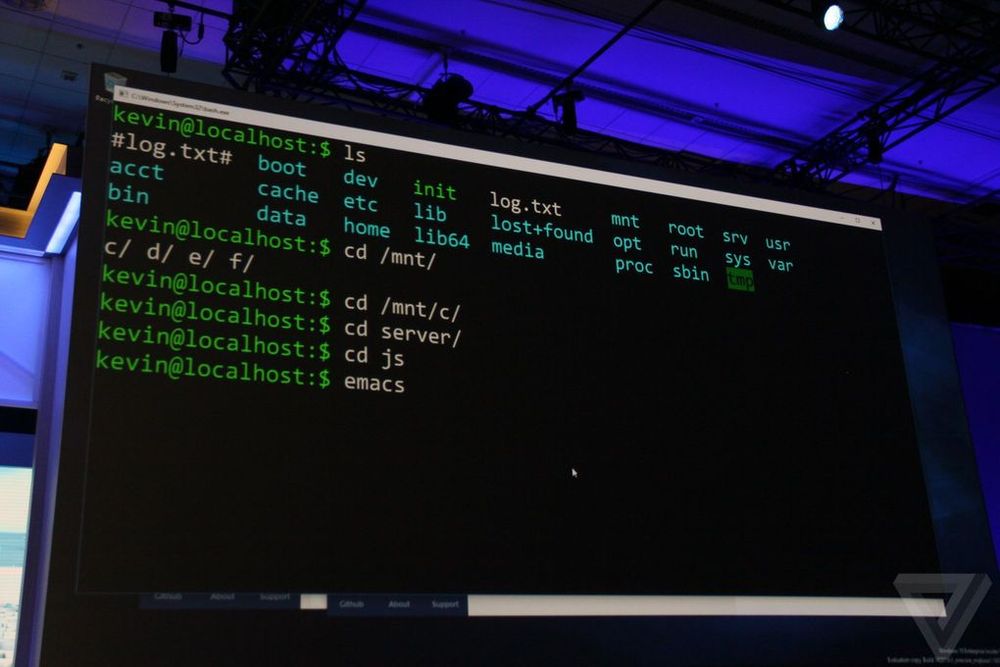
Microsoft Build 2016! - BASH on Windows 10

Its that time of the year, where Microsoft will be unveiling new technologies at Build 2016. Microsoft is reaching out to Linux developers in a way that the company never has before. “The Bash shell is coming to Windows. Yes, the real Bash is coming to Windows,” said Microsoft’s Kevin Gallo on stage at Build 2016 keynote. The announcement received an uproarious applause from the crowd. The new functionality will be enabled as part of this summer’s Anniversary Update to Windows 10. “This is not a VM. This is not cross-compiled tools. This is native,” he said. “We’ve partnered with Canonical to offer this great experience, which you’ll be able to download right from the Windows Store.” Third-party tools have enabled this sort of thing for years, but a direct partnership between Microsoft and Canonical should offer even more flexibility and convenience for developers who prefer using these binaries and tools. All of the Linux commands are shown to be running natively, as shown in the video below: https://sec.ch9.ms/sessions/build/2016/P488.mp4 With this added functionality, developers can now code and develop in Linux natively ...

Remote Desktop into Ubuntu Server with GUI on Windows Azure

Someone was trying this out and could not get this to work so I mentioned I would write an article if I got it working and I did get it working so here is the article. Let’s not have much of the usual gibberish that I write at the start of the post and get straight to the point. What you would need: 1. 30-Day Trial Azure Subscription [link] (If you do not have one) 2. A little bit of knowledge of Linux shell commands 3. PuTTY [link] on Windows | Terminal on OS X 4. Remote Desktop Client (It’s on the Mac App Store for you OS X users. P.S. The OS X Version is also really pretty.) [link] Create your Virtual Machine through Windows Azure and let’s make one running the latest Ubuntu which is 14.04 LTS as seen below. Give it a little bit to create, eat a cookie, drink a cuppa joe or anything that can be done in 5 minutes. Once that’s done, go to the Endpoints section of the Virtual Machine and click Add to add an Endpoint. Once you see this click next and select Remote Desktop as the name of the Endpoint, all the relevant details will be filled out for you (yipee) and just hit the tick at the bottom right. Wait a little again and your Endpoint will be successfully added. Moving on to commandline stuff! Fire Up PuTTY and fill in your login details as such or if you are on OS X follow the image below PuTTY one. Now, let’s proceed onto this by just typing commands into the box above. Each line means a new command. ...

Introduction to Linux Computing

So I’m sure most of our readers have heard of Linux before? No? Maybe you have seen this linux penguin before? [caption id="" align=“alignnone” width=“307”] Tux the Linux Penguin[/caption] Nonetheless this is for those of you who have heard of Linux or the many distributions of Linux but perhaps think it’s too complicated or a long list of other reasons why you never used Linux. So now you may ask me, so what in the world is Linux? The straight answer to this question is It’s an Operating System like Windows or Macintosh. Some of you may have never had the chance to utilise Linux but Linux is more prevalent in systems than you think. Have a router, smartphone, network access storage or media streaming player? They all basically have Linux at their core. Let me introduce you to a flavour(distribution) of Linux. It’s called Ubuntu. The image below is how Ubuntu 14.04 looks like. Looks sleek and neat right? You were thinking Linux looked more like white text on a black box right? Like the image below perhaps? Well this is true in both senses but let’s not delve too deep into that area as that will just complicate things for now. If you want to try out Linux, there are tons of ways to do it but I’m going to propose the simplest way for all of us to do this and that is to use a virtual machine! So let’s move on to what we need. 1. VirtualBox [link] 2. VirtualBox Extension Pack [link] 3. Ubuntu 32-bit [link] 4. A Working Computer running Windows, OS X 5. Yourself Now that we have download all of the above, Install VirtualBox as well as the Extension Pack. Get Ready with the Ubuntu ISO you just downloaded and let’s proceed to install Linux! Create a new Virtual Machine below by pressing on the obviously blue new button. Fill up some details about your machine, go crazy here. Suggestion for names: “Superman’s Fortress of Solitude”, “The Bat Cave”, “Winterfell”, “King’s Landing” and many more great ideas you may have. I went with a boring name. Just hit next all the way and proceed with the default options. Let’s turn on our Virtual Machine. Press on the bright and beautiful green arrow “Start”. You will see the below and will have to select the Ubuntu ISO that you previously downloaded. I have selected the ISO and we are roaring to go! Hit Start. The Boot Screen for your Virtual Machine. Yay we have booted into the Ubuntu Menu. Let’s proceed straight to Installing Ubuntu. Select the second option with your keyboard and hit enter. You’ll see both options if you let your virtual machine autoboot without seeing the screen above. If that’s the case, just hit on the “Install Ubuntu” button. Select the options like in the image below and continue. Erase the whole disk and install Ubuntu. Select your country. Select your keyboard layout. Usually it would be English (US) unless perhaps maybe you are special? Fill in your name below! We can get creative here again. Some examples could beeeee “Clark Kent, “Bruce Wayne”, “Ned Stark”, “Robert Baratheon” and maaany more you can think of. Now Ubuntu is beginning to install. It will be done in quite a jiffy. Yay! It’s done. Let’s reboot. You might see this when it’s rebooting. Oh look! We have just installed Ubuntu on your computer. Time to login with the password that you typed above. We will need to set-up Guest Additions for Ubuntu to enable some features for VirtualBox. Select the menu below and select Insert Guest Additions CD image…. The Guest Additions Image will appear as below and all you have to do is click Run Software. It will give you a warning prompt, just hit Run. Your password is required again for this. Compiling… Installation done! Press Enter and it will close the window. We should reboot our Virtual Machine again so at the top right just select reboot. Whew. Wow, that was such a long post with so many images. Hopefully the images helped you along the way to put one leg into the Linux Computing world. Ubuntu is a very popular Linux OS that can be installed on almost every Laptop. Now is the time to play around with Ubuntu, try using the Operating System by itself and see if you can figure out some stuff. I’ll write another follow-up post to this one and explore even more of Ubuntu and perhaps we will start that post off with Installing some packages. Have fun with your new Linux System. If you have any issues, feel free to comment below and I’ll address them there.

OpenVPN Community on Windows Azure

Looking for a guide to get the OpenVPN Community Version on Azure? Follow the guide below. So first up, What do we need? 1. 30-Day Trial Azure Subscription [link] 2. A little bit of knowledge of Linux shell commands 3. PuTTY [link] 4. OpenVPN GUI [link] Right. Now that we’ve gone through the pre-requisites, let’s move on to the fun part. First up, we gotta head into Azure and create a virtual machine. Let’s quick create a machine as seen below. A shared core and 768MB of RAM is more than enough for just an OpenVPN server as the overhead isn’t too large. If you want to change the region to another region, go ahead but leave the rest as defaults. Note down the password you use and the username. Once you press the create button, give it a little bit for Azure to set-up everything and then proceed to the next step once you see it’s Status in Azure has been updated to “Running” with a green tick at the left. Now we have to configure some endpoints on the virtual machine itself as to make sure that your internet traffic is able to reach the virtual machine. Go to the Endpoints Tab in your Virtual Machine once it’s been created and hit the add button at the bottom. Both buttons have been highlighted in the image below. Once you select add, you will be presented with a small pop-up wizard. Configure it according to the two images below If it is done correctly, you should have an Endpoints tab looking like the one below. If all is good, it’s time to move on to configuring the virtual machine you just set-up! Now’s the time to fire up PuTTY that you downloaded just a moment ago. Fill up the relevant details in this format: username@dnsname Example: azureuser@spiffyrocks.cloudapp.net Hit Open to start connecting to the virtual machine. You will most likely get a warning like the one below but just hit yes. Next up you’ll have to key your password into the black box, don’t worry if you do not see your password being typed and just continue typing it and hit the Enter key when you’re done. You should be logged into your Azure Virtual machine now and should see something similar to the image below. Now, let’s proceed onto this by just typing commands into the box above. Each line means a new command. ...