Every day after work, during dinner, our team will chat about what we have learnt, what we have done, and new project ideas. Today, I’d like to share with you one of our dinner topics about customizing authorization attribute in ASP .NET MVC5. [caption id=“attachment_21371” align=“aligncenter” width=“922”] Having dinner in airport transit area after work is enjoyable.[/caption] We’re now working on building a product management web application for a small company of around 100 employees. In the company, there are many teams, such as marketing, design, retail, product, advertising, and so on. One of the project requirements is thus to allow user logging in to the system with their own account. In ASP .NET MVC 5 project, by default, if individual user account is chosen as the authentication mode, ASP .NET Identity will use Entity Framework Code First to create a database and then store all the user information in a database. [caption id=“attachment_21378” align=“aligncenter” width=“756”]
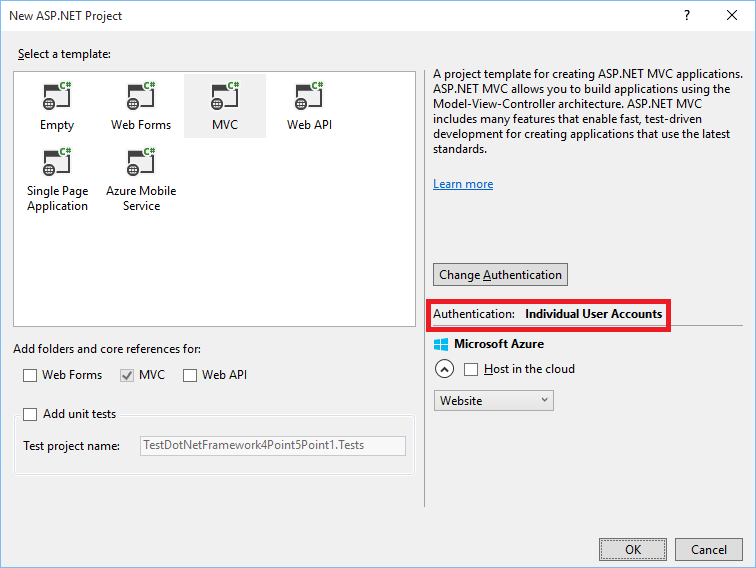 Individual User Account option in Visual Studio 2013[/caption] Role Based Access Control Normally, there will be five tables generated: AspNetUsers, AspNetUserRoles, AspNetRoles, AspNetUserLogins, AspNetUserClaims. With the help of the first three tables, we will be able to implement role-based authentication which we can restrict access to parts of our application by roles. How do we define roles? In some applications, the roles are super admin, manager, operator, agent, etc. For our case, the teams are the roles. So we will have one role for each individual team. After that, we can easily add all members in the team to the corresponding role. Then in our web application, we will be able to check if the current logged in user has the role to access or not by decorating our controllers with Authorize attribute as follows.
[Authorize(Roles = “Marketing Team”, “Advertising Team”)] public ActionResult ViewReferralReport() { return View(); }
Go Beyond Usernames and Roles: Claim Based Access Control Now, if there are some of the members in the marketing team not supposed to view referral report then role-based authentication solution is not really suitable for our case. We need to assign different permissions to each individual team member. Hence, my colleague suggested to use claim-based authentication. By using that, we can set the claim for those members in the marketing team who are not allowed to view the referral report.
string userId = User.Identity.GetUserId();
await _userManager.AddClaimAsync(userId, new Claim(“Can view referral report”, “false”));
Then in the ViewReferralReport controller, we can check the user has the permission to access the view or not by getting all the claims of the current logged in user as follows.
var currentUserClaims = await _userManager.GetClaimsAsync(userId);
Customize Authorization Attribute to Suit Our Needs Both of the access control methods above remind me of the permission management in Drupal 6 (The last time I touched Drupal was already 4 years ago). [caption id=“attachment_21368” align=“aligncenter” width=“575”]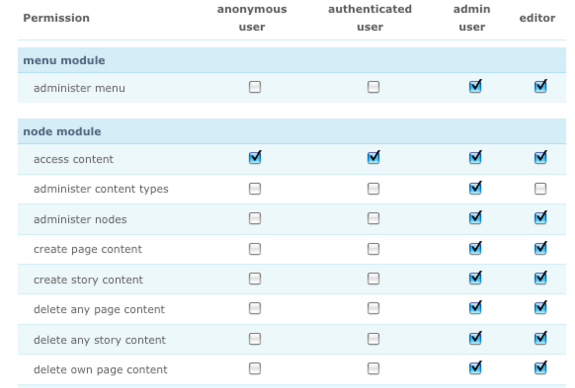 Permission control page in Drupal.[/caption] The Drupal way combines both the advantages of role based and claim based access controls with a simple table. So, we decided to build something similar to that by customizing the Authorize attribute. The model of our permission table is as follows.
public class Permission { [Key] public int Id { get; set; }
public string ModuleName { get; set; }

public string FunctionName { get; set; }

public string Role { get; set; }

public string UserIdentityName { get; set; }

public bool IsAllowed { get; set; }
}
The reason why we have both Role and UserIdentityName is because we want to able to store as little rows as possible in the permission table. For example, there are 20 users in marketing team. However, only 4 of them are not allowed to perform a certain action in the system. Then we will only keep 5 rows for this case, as demonstrated in the picture below. 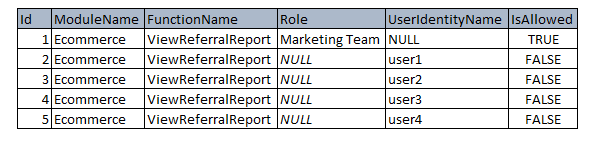 Then we will have our customized authorize attribute as follows.
public class ModuleFunctionAccessAttribute : AuthorizeAttribute { public string ModuleName; public string FunctionName;
protected override bool AuthorizeCore(HttpContextBase httpContext)
{
    var authorized = base.AuthorizeCore(httpContext);
    if (!authorized)
    {
        // The user is not authorized, so cannot access anything at all
        return false;
    }

    if (user.IsInRole("Super Admin"))
    {
        // The user is Super Admin, so he/she can access everything
        return true;
    }

    string currentUserIdentityName = user.Identity.Name;

    bool isCurrentUserRoleAllowedToAccess = false;
    using (var db = new ApplicationDbContext())
    {
        var existingPermissions = db.Permissions.Where(
            p => p.ModuleName == ModuleName &&
            p.FunctionName == FunctionName).ToList();

        // Check if the role is allowed to access the function in the module or not
        foreach (var permission in existingPermissions)
        {
            if (!string.IsNullOrEmpty(permission.Role) && user.IsInRole(permission.Role))
            {
                isCurrentUserRoleAllowedToAccess = permission.IsAllowed;
                break;
            }
        }

        // Check if user is allowed to access the function in the module or not
        foreach (var permission in existingPermissions)
        {
            if (string.IsNullOrEmpty(permission.Role) &&
                permission.UserIdentityName == currentUserIdentityName)
            {
                return permission.IsAllowed;
            }
        }
    }

    return isCurrentUserRoleAllowedToAccess;
}
}
We are now able to decorate our controllers as follows.
[ModuleFunctionAccessAttribute(ModuleName = “Ecommerce”, FunctionName = “ViewReferralReport”)] public ActionResult ViewReferralReport() { return View(); }
With this customized authorize attribute, the controllers will not have any logic about authorization. So anytime we decide to allow/disallow other teams to access the controllers, we do not need to update all of our controller authorize attribute and re-compile our application. Instead, we just need to make changes to one single Permission table. There is still room for improvement in our approach to do authorization. If you have any thought about this topic, please let me know by leaving a comment below. Thanks! =)