Introduction
Stereoscopic 3D in VR works by rendering the scene twice; once with the camera on the left eye, and once on the right. This means that in order to produce a 3D effect, the scene has to be rendered twice – the draw calls for each frame doubles. This is why most games and applications will experience a significantly lower framerate in VR. The only difference between the left and right image is the slight shift in perspective. Culling and shadow computation for the game objects are identical in both, and can be optimized by drawing them in the same draw call. This way we can significantly improve the performance of VR applications.
Single Pass Stereo
Single Pass Stereo rendering is a feature that improves performance by rendering the image for both eyes in a single texture buffer. This allows the scene to be rendered more efficiently as both eye share the work required by culling and shadow computations. We will often get much higher framerates with this feature enabled. The comparison images below show the difference between normal VR rendering and Single Pass Stereo rendering. Normal VR rendering:

Single-Pass Stereo VR rendering:

Enabling Single Pass Stereo
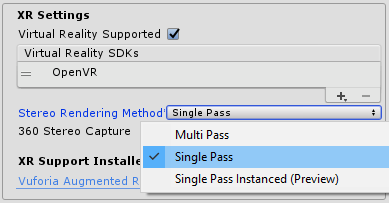
1. Open or create a new Unity project. 2. Open PlayerSettings Edit > Project Settings > Player. In the PlayerSettings menu, under the XR Settings tab, ensure that the Virtual Reality Supported option is checked. 3. With VR support enabled in XR Settings, a new dropdown named Stereo Rendering Method would appear under XR Settings. By default, this option is set to Multi Pass. Change it to Single Pass to enable SPS.
4. Create a complex scene and note the FPS in stats window.
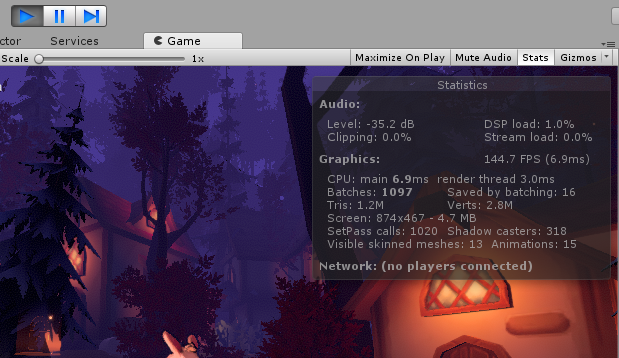
5. Switch between Multi-Pass rendering and Single Pass rendering and note the difference in FPS. Remember to enter play mode. If you do not observe a significant improvement in FPS, the scene may not be complex enough to benefit from SPS.
Modifying Shaders to support SPS rendering
While the Standard Assets and the post processing stack already supports SPS, custom shaders and image effects will have to be modified to enable support for SPS in VR. With SPS enabled, the camera now renders the texture for both eyes into a single render texture. This means that any shader that attempts to read the rendered camera texture would need to sample a different part of the texture for each eye. This can be accomplished by sampling render texture with an offset UV coordinates for each eye. Luckily, Unity provides various helper functions in the UnityCG.cginc to do this easily.
Fixing Post-processing effects
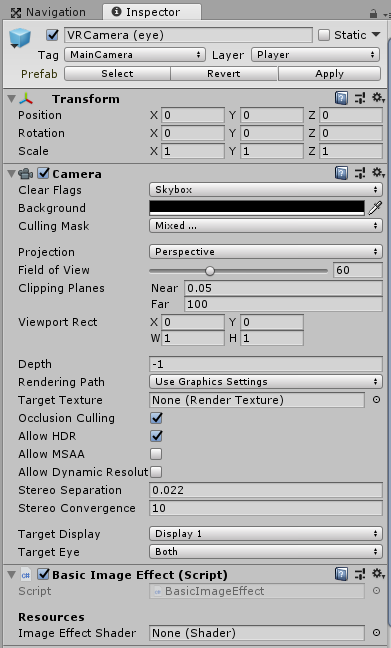
Let’s walk through an example of how a custom image effect would have to be modified to enable support for Single Pass Stereo. If you’re already familiar with creating post process scripts, you can skip past the first few bits. If not, let’s create a simple image effect to demonstrate. 1. Download BasicImageEffect.cs and add it to your Unity Project. 2. Attach the image effect script to your main camera.
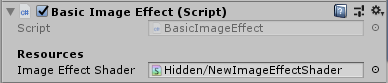
3. Create a default image effect shader Assets > Create > Shader > Image Effect Shader and name it inverse. By default, a new image effect simply inverses the color of the render texture. 4. Attach the new shader into the Image Effect Shader field of BasicImageEffect.cs
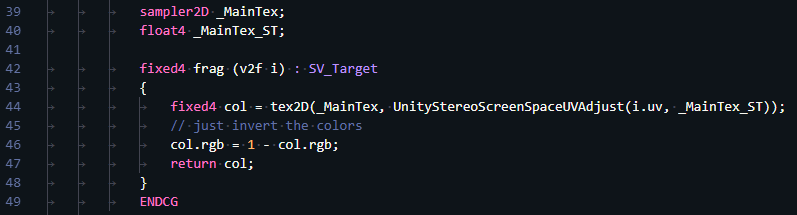
5. Ensure that VR support and SPS are both enabled, and enter play mode. (Skip if no VR headsets are connected to your machine, as the issues are only visible in the headset). Note the rendering issues. 6. Open the Inverse Shader created earlier and look for the frag function.
fixed4 frag (v2f i) : SV_Target { fixed4 col = tex2D(_MainTex, i.uv); col.rgb = 1 – col.rgb; return col; }
7. The sampler2D MainTex is a texture which contains the rendered texture from the camera. This is the texture that contains the left eye render on one side and the right eye render on the other with SPS enabled. Declare a float4 with the name _MainTex_ST.
sampler2D _MainTex; float4 _MainTex_ST;
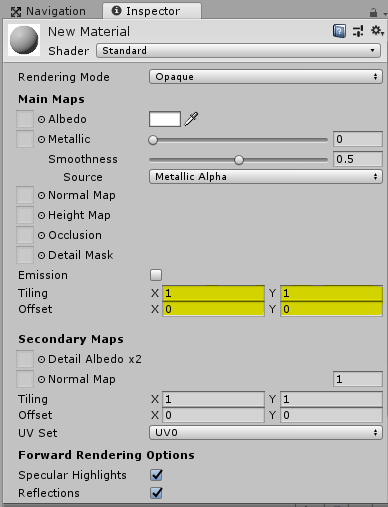
A float4 in Unity’s Shaderlab code is simple a 4-component float, similar to Vector3 (3 component float) and Vector4 (4 component float) in C#.
When a float4 is declared with a name matching a particular sampler2D suffixed with _ST, Unity automatically populates this variable with tiling and offset values for this texture. For easy visualization, it is basically these values:
Using the helper function UnityStereoScreenSpaceUVAdjust and the tilling and offset data in the variable we declared earlier, we can offset the UV lookup and enable SPS support for this particular image effect shader.
Replace fixed4 col = tex2D(_MainTex, i.uv); With fixed4 col = tex2D(_MainTex, UnityStereoScreenSpaceUVAdjust(i.uv, _MainTex_ST));
Your final frag function should look something like this:
8. Enter play mode. Note that the rendering issues have been fixed.